Research
Research
Special Effects (SFX):
A special effect is a visual illusion or trick created on set/location for a film, theatre, video game or more to simulate an imagined event in a virtual world or story.
Types of special effects:
This video from the behind the scenes of game of thrones (One of my favourite shows with makeup usage) showcases the special effect of completely changing the actors hair. The intention of the effect is to portray a person to look differently than how they do realistically.
Pyrotechnics - Creating explosions, fireworks, flames.
From this video we learn that pyrotechnics in film can often be used for explosions. They require a lot of planning and many test have to be done before they carry out the final explosion.
Pyrotechnics are always used to insert action or thrill to a movie which they do, most of the time.
Stop Motion
Stop motion is a special effect where you take a picture of a scene, change something about it, then take another and eventually you play all the photos together and it looks like it is moving.
Puppetry
Used heavily in films like 'The Muppets', puppetry is a special effect which involves the puppetry of inanimate objects.

Theatrical Blood

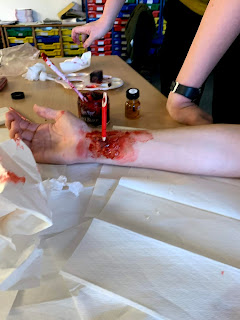
In every film which contains blood, it is almost certainly created as a special effect using theatrical blood. it is people jobs in order to make sure these fake wounds and blood look as realistic as possible.
Fake blood is used in order to prevent having to have actors actually harm themselves in movies. It is done as a special effect as it is easier to see on the day what it looks like on set. This picture online displays this very well.
Visual Effects (VFX):
A Visual Effect is a term which describes imagery being manipulated or enhanced for a film or any other moving imagery that cannot take place in live action filming and is often done on a computer.
Types of visual effects:
Computer generated Imagery (CGI)
Computer generated Imagery (CGI)
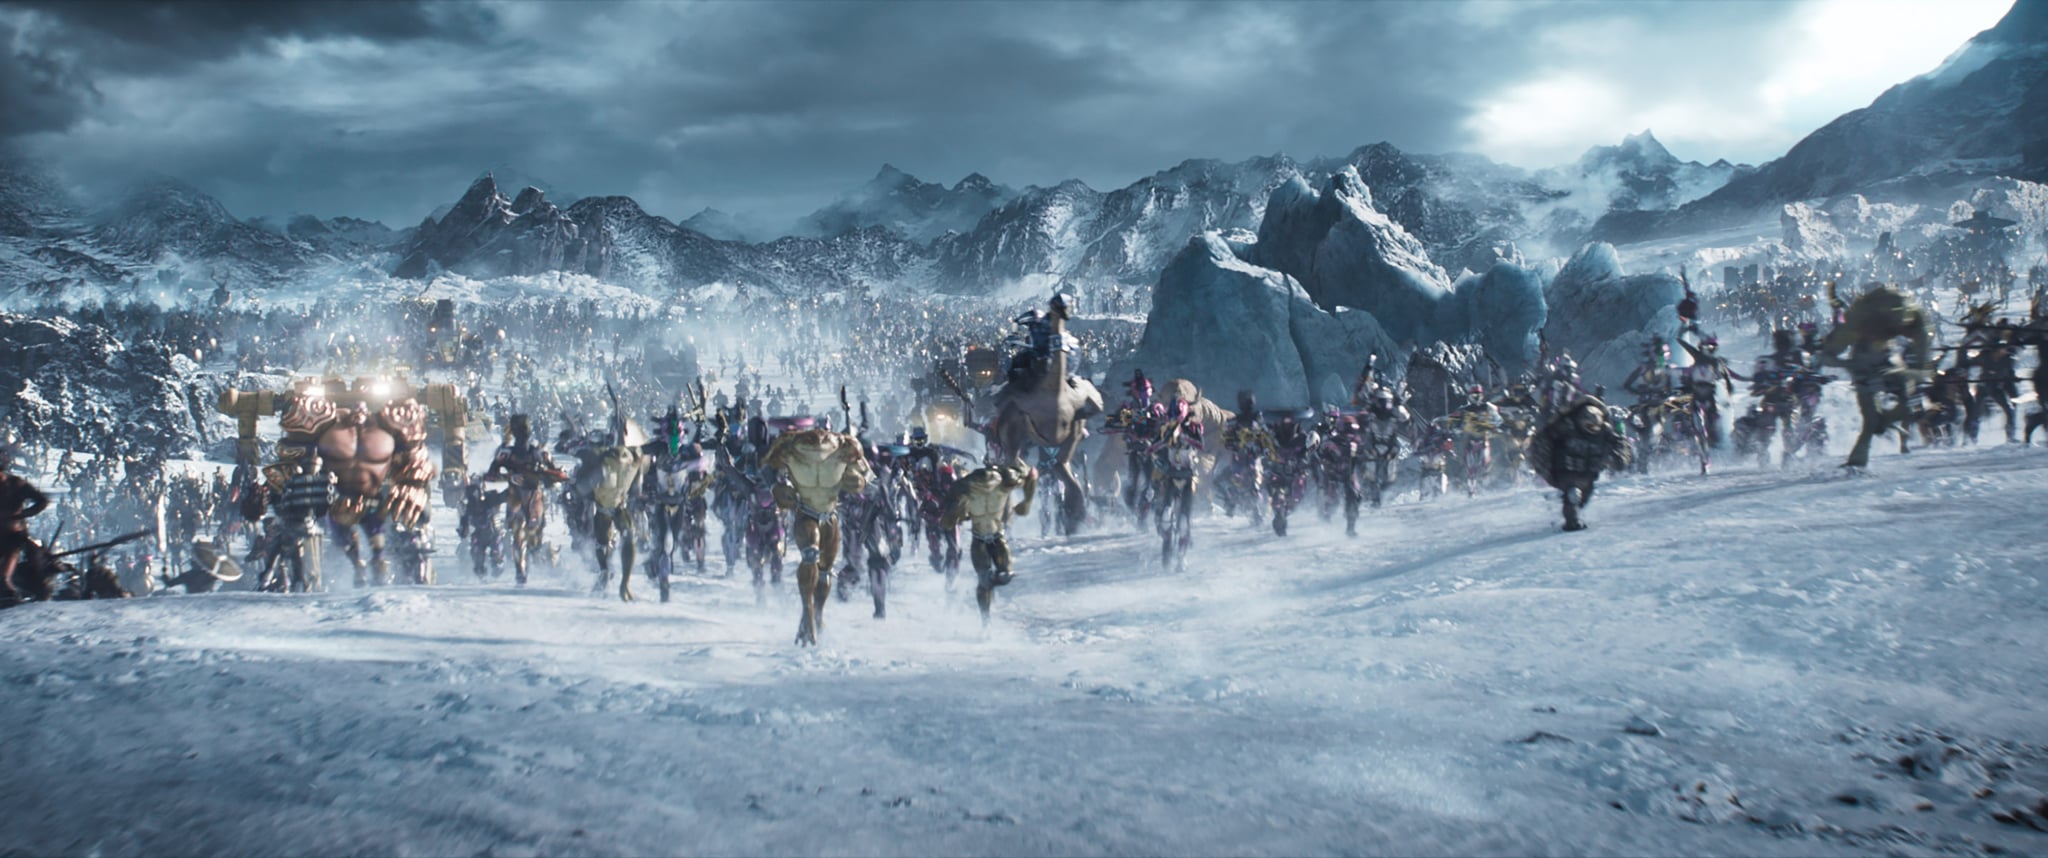
This scene from the feature film Ready Player one (A CGI heavy film) utilises Computer generated imagery in order to create not only the large snowy and rural location, but also the vast and varying amount of people and characters seen within the crowd.
Wire removal - Removing wires used in filming to show flying or for safety

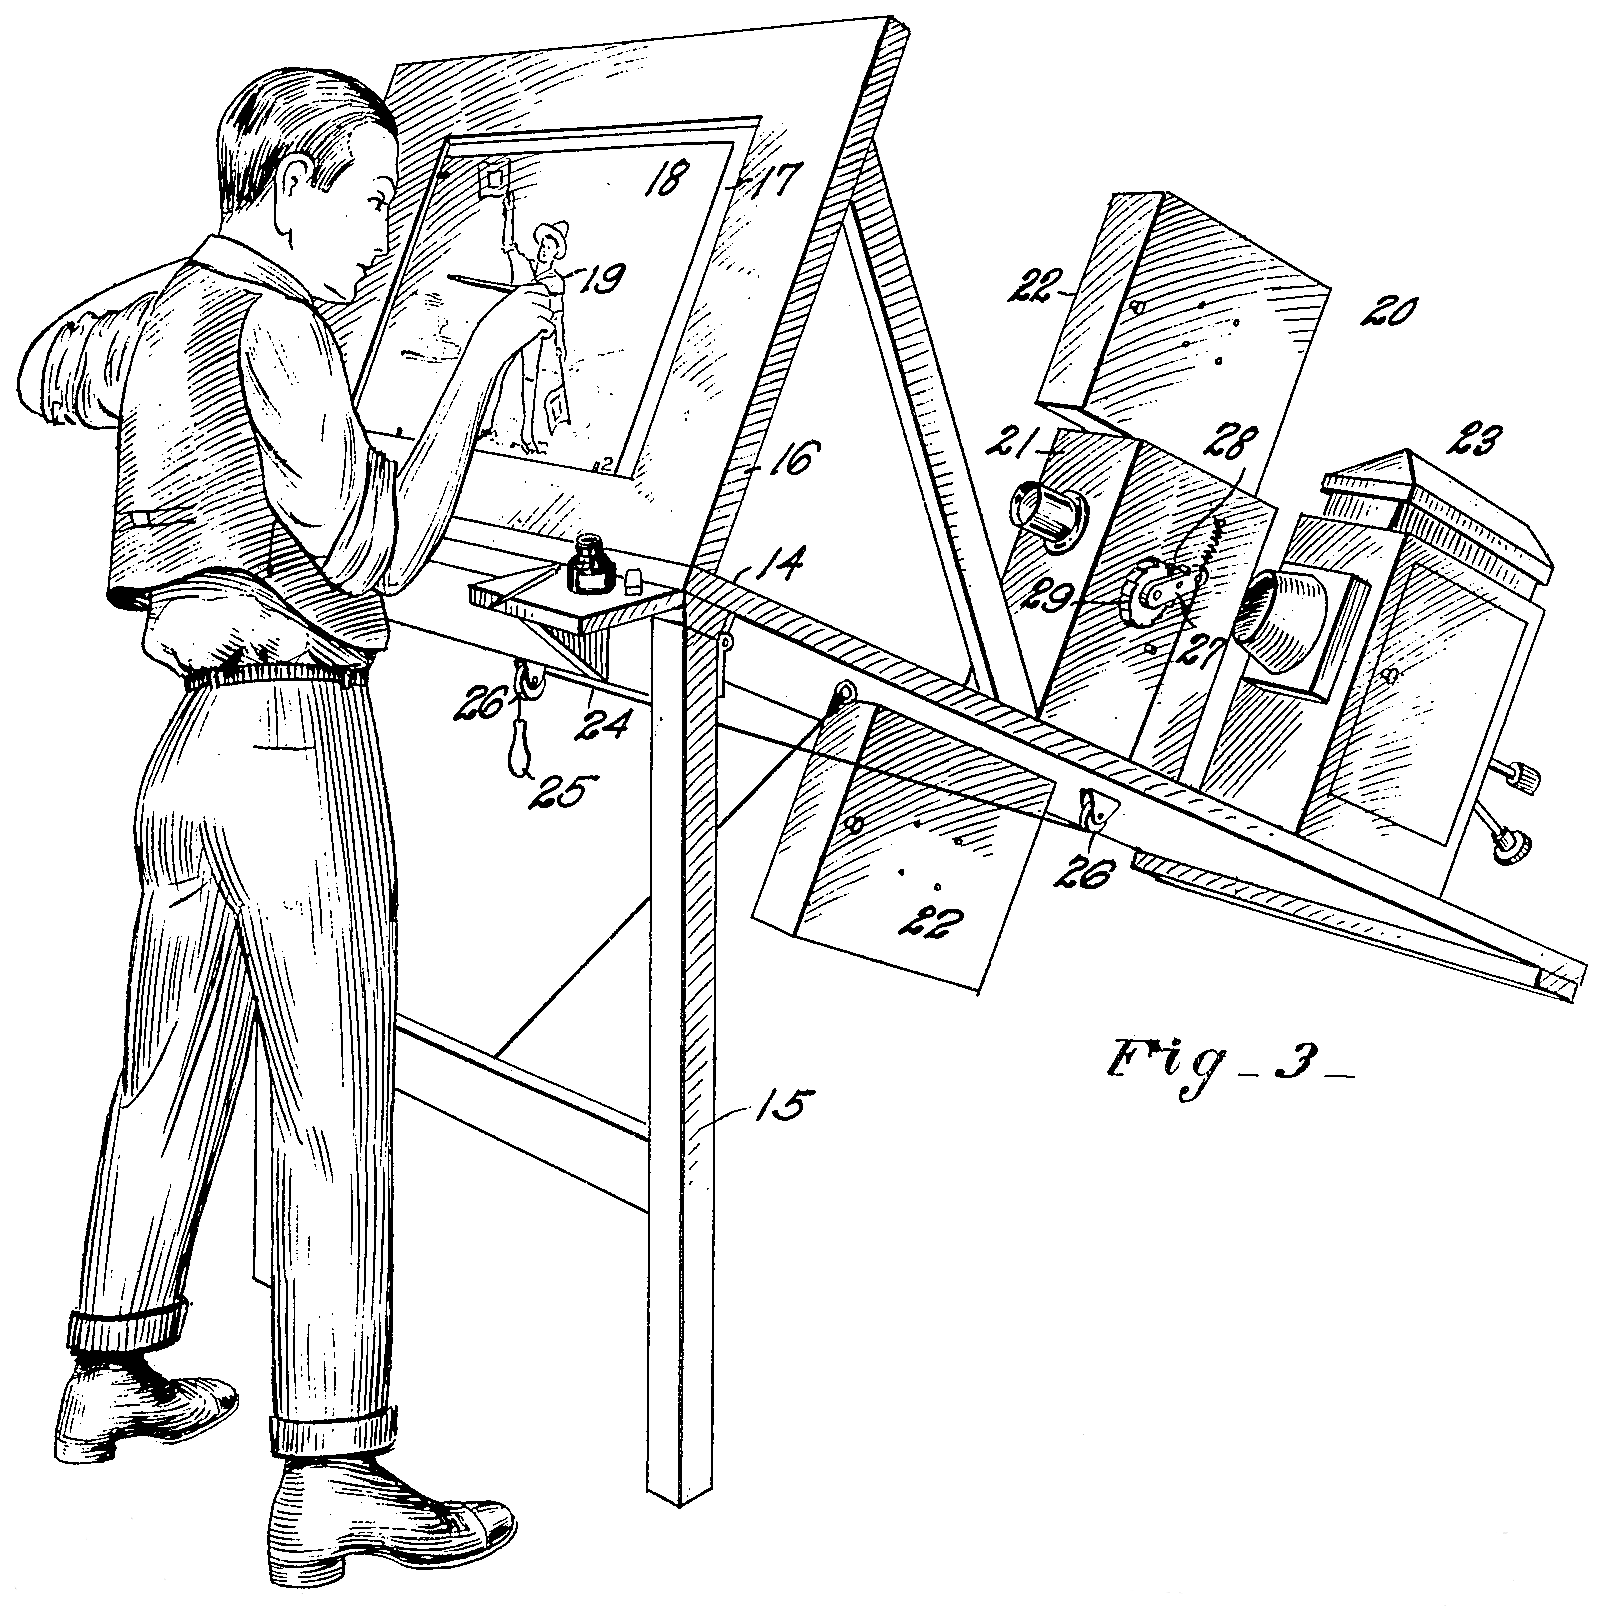
Wire removal involves the removal of, well wires (surprisingly). In this image from the filming of guardians of the galaxy you can see wires used to give the effect of the character leaping through the air. In the final film, through the use of computer software the wires will have been 'removed' and not visible to the audience.
Compositing - Combining Visual elements from separate sources into one image, often using chroma key and green screens.

This is an example of Compositing. It is where you put multiple elements onto one image. In this image the space man is stood in front of a green screen. They then cut the space man out and put it onto another layer which they also add the earth too. This is several different elements all combining to one.
3D Modelling
When looking up 3D Modeling it becomes apparent that this is heavily used in throughout the movie industry. It works hand in hand with CGI in a lot of movies.
In this video, at 1:20 you can see an example of where 3D Modeling was used for the TV show Mind hunter. Instead of the production company going out and buying several old tv's they decided that the effect can be achieved with 3D Models.
Rotoscoping
Rotoscoping is the process of 'tracing over a visual element frame by frame'. In the olden days this was done physically by drawing. Now days this is done using any video compositing software. The video I watched below taught me it can be used if you want to get rid of an item in the background of your shot, but you should try and use it as a last resort as it is a really lengthy and time consuming process.
Detailed Analysis
Special effects
Prosthetic Makeup
Prosthetic makeup enhances scenes by allowing an actor to fit into the role they are playing with more precision, no matter how they look. This allows for more focus for the viewer as they will not be distracted and can stay immersed.
Makeup in movies is essential in order to immerse the audience. I personally think it is one of the most important aspects in immersing people into the world of film as it allows humans to be changed to fit the personality of a character that they are trying to portray.
-----------------------------------------------
Ref: https://www.youtube.com/watch?v=-m7VDy5N5vs
Prosthetic makeup takes a lot of work to get right. In order to best create the correct impressions of the actor makeup artists take what is called a 'lifecast'. This is where makeup artists take a gloop like material called alginate. This is very good at getting impressions of the body in great detail. As shown in the video below, it can be quite a dangerous method as it requires the actor to only breathe out of their nose, and if they were to accidentally block the nose up it could lead to suffocation. Life casting is a process that can range in lengths of time, the younger and smaller the person then the quicker it will be.

Ref: https://www.youtube.com/watch?v=-m7VDy5N5vs
In terms of using this special effect for my mini FMP I do not believe it would be practical because:
- It would take multiple hours - probably more time than is practical
- It could be dangerous to attempt a lifecast when I do not know what I am doing
- It is expensive.
6/2/20, 2:30PM
This lesson I completed my research into Prosthetic Makeup and learn lots about the detailed ways in how people ensure that it is done. I decided that it is probably not something that I would enjoy to do. It is also time consuming.
Next lesson I will continue my research.
Computer Generated Imagery (CGI)
Computer generated imagery is when computer generated graphics are applied to the film in order to enhance a scene. They can enhance scenes drastically by bringing the look of an actor who passed away back to life or lesser so by adding a small animation to the corner of a screen.
In one of the star wars films, CGI was used to bring a character back to life as unfortunately the actor passed away. This was a great use of CGI for the film and helps to immerse and benefit the audience as the character will have looked the same between the films allowing for less confusion and more immersion. I learnt a lot about how this are of CGI is done by watching this video:
https://youtu.be/xMB2sLwz0Do?t=149
The video explained how this process worked. It used special camera technology and suits on a real actor. They used this to map his facial movements out, before placing it on the model in the computer. From then on they went onto texture etc.
Another use of CGI in movies is instead of pyrotechnics. An example of this can be seen below in which marvel used a computer generated explosion for their film in order to save costs, time and for better safety.

The common aspect with CGI is that it is not a quick process. The are often many many parts to consider when creating some CGI for a film, from modeling to texturing to mapping and animating and much more.

These are just two methods in which CGI can be used for movies and films, however computer generated imagery has almost unlimited possibility.
Rotoscoping
Rotoscoping is the animation of masks across a series of frames. It allows you to essentially separate your two dimensional imagine into a multi layer image.
Rotoscoping has a large history and while now mostly done digitally, rotoscoping originally involved filming scenes in live action and then projecting the film onto glass panels so an animator could trace the action in every frame. This was used for a lot of animated films, and was widely used by disney for films like pinocchio and the seven dwarves. They would have used it to trace over the live actors for the animation.
Rotoscoping in the modern days now is handled by VFX artists and is done digitally. Now days it is often used for wire removal, changing the background or foreground of an image and much more. The video below shows examples of this - it also taught me how I would go about rotoscoping if I wanted to do it.
https://www.youtube.com/watch?v=0VT3ODb8vsA
The downside to rotoscoping is it's extremely time consuming nature if you are going to rotoscope anything that is more than a second long.
Stab makeup SXF research
Putty/Clay
Fake blood
Liquid Latex
Foundation
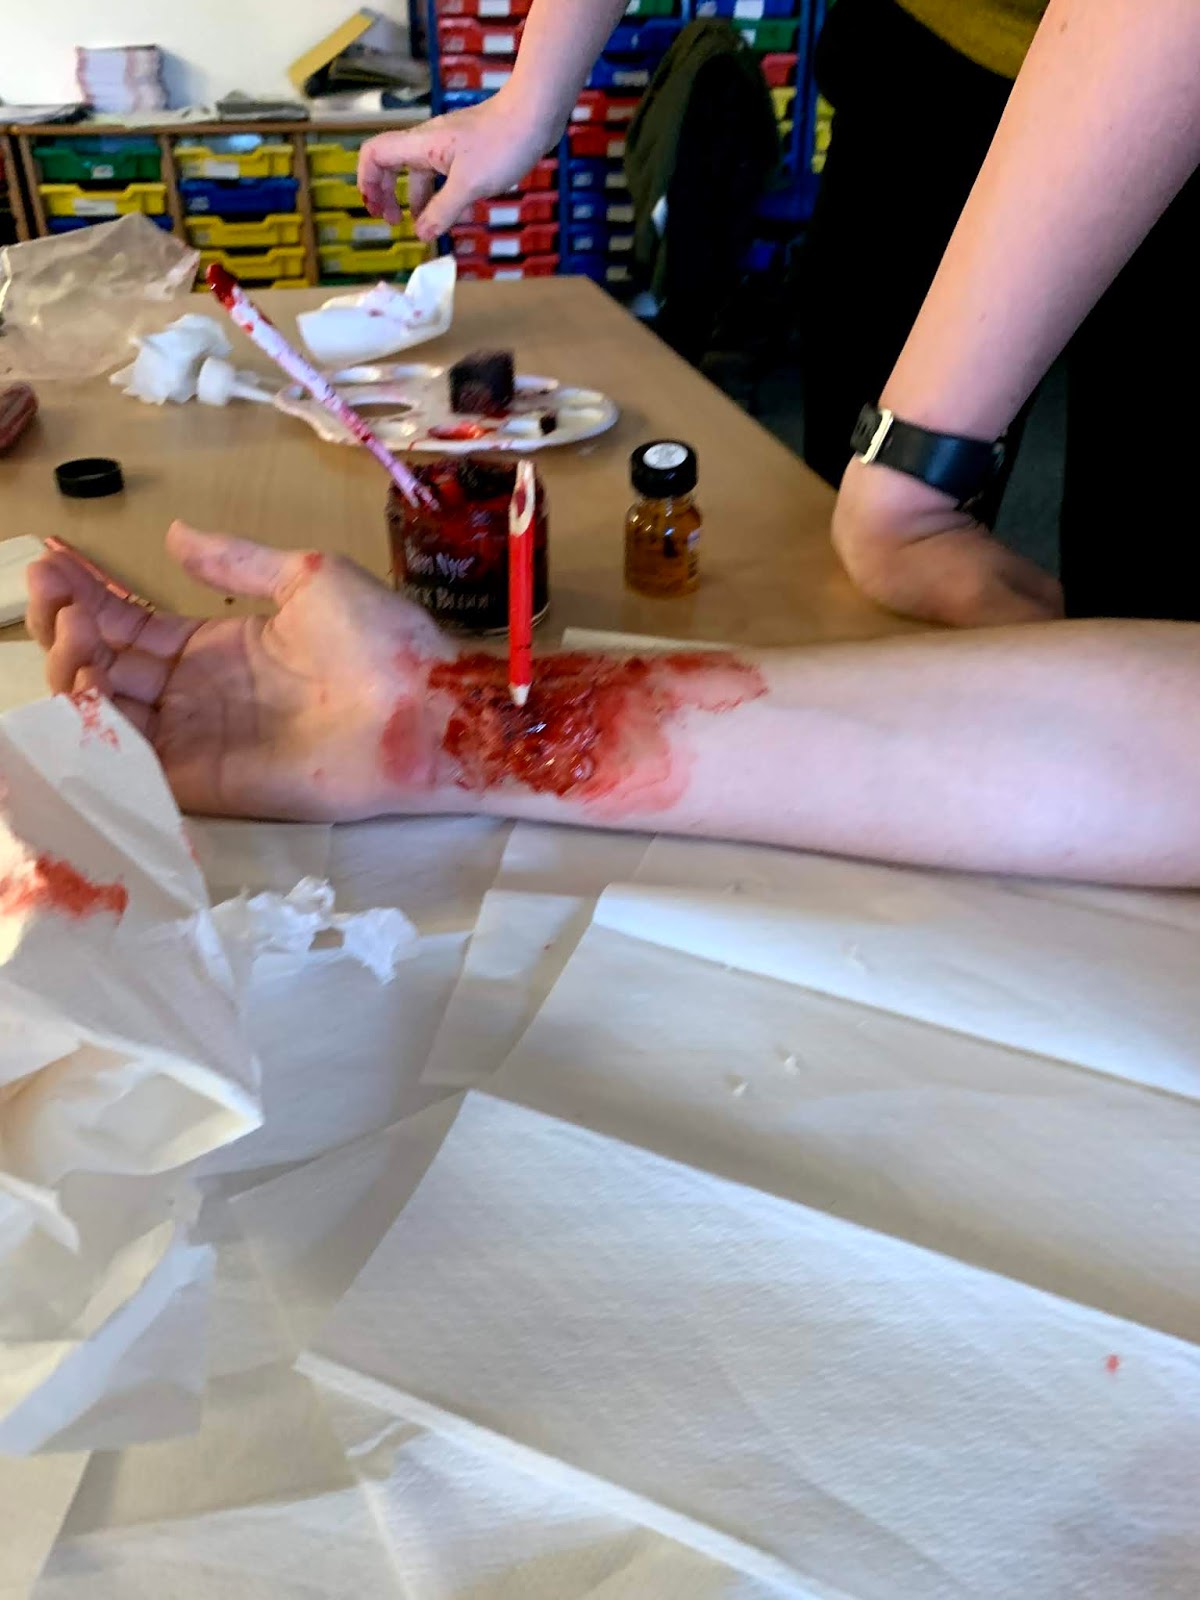
We started the makeup by getting out clay. We rolled this into a sausage like shape before proceeding to flatten it out into a flatter shape. We then tried to apply this clay to Alex, but we could not get it to stick. In order to try and get it to stick we thought that it would be a good idea to use glue on the clay.


The glue did also not provide any help with making the clay stick to the hand so we tried to use a balm which was out. This did also not work. The last idea to make it stick which we had was to use the latex on the bottom of the clay. This again did not give out the outcome we wanted. Eventually we just kept pressing the clay down on the arm with the hope it would stick, which it did!
Now the clay was on the arm we used a clay carving tool in order to cut a crevice into the clay acting as the point where the weapon went deepest into the skin. We also applied a foundation around the clay in order to blend it into Alex's skin however, the foundation was not the right tone for Alex.


Having spent some time thinking about a visual effect I could employ for use in my mini FMP, I stumbled across the idea of making a portal (the video game) inspired video. If you look this up on YouTube you come across many different implementations of this.


Computer generated imagery is when computer generated graphics are applied to the film in order to enhance a scene. They can enhance scenes drastically by bringing the look of an actor who passed away back to life or lesser so by adding a small animation to the corner of a screen.
In one of the star wars films, CGI was used to bring a character back to life as unfortunately the actor passed away. This was a great use of CGI for the film and helps to immerse and benefit the audience as the character will have looked the same between the films allowing for less confusion and more immersion. I learnt a lot about how this are of CGI is done by watching this video:
https://youtu.be/xMB2sLwz0Do?t=149
The video explained how this process worked. It used special camera technology and suits on a real actor. They used this to map his facial movements out, before placing it on the model in the computer. From then on they went onto texture etc.
Another use of CGI in movies is instead of pyrotechnics. An example of this can be seen below in which marvel used a computer generated explosion for their film in order to save costs, time and for better safety.
The common aspect with CGI is that it is not a quick process. The are often many many parts to consider when creating some CGI for a film, from modeling to texturing to mapping and animating and much more.
These are just two methods in which CGI can be used for movies and films, however computer generated imagery has almost unlimited possibility.
Rotoscoping
Rotoscoping is the animation of masks across a series of frames. It allows you to essentially separate your two dimensional imagine into a multi layer image.
Rotoscoping has a large history and while now mostly done digitally, rotoscoping originally involved filming scenes in live action and then projecting the film onto glass panels so an animator could trace the action in every frame. This was used for a lot of animated films, and was widely used by disney for films like pinocchio and the seven dwarves. They would have used it to trace over the live actors for the animation.
Rotoscoping in the modern days now is handled by VFX artists and is done digitally. Now days it is often used for wire removal, changing the background or foreground of an image and much more. The video below shows examples of this - it also taught me how I would go about rotoscoping if I wanted to do it.
https://www.youtube.com/watch?v=0VT3ODb8vsA
The downside to rotoscoping is it's extremely time consuming nature if you are going to rotoscope anything that is more than a second long.
Stab makeup SXF research
In order to be able to create a realistic knife cut using makeup I had to lookup a lot of tutorials.
From watching the video above It became apparent to me that to get the depth, the use of some sort of putty or clay was essential. This can then be coloured using foundation and fake blood in order for it to blend in.
The use of latex can be very important in order to ensure that the clay or putty has set well.
This video backs up the idea of using a putty or clay in order to ensure the depth in the wound.
It has also become apparent by watching both of these videos that we need to use a darker blood the deeper down as it gives off the most realistic effect.
We have researched that we will need:
Putty/Clay
Fake blood
Liquid Latex
Foundation
The Process
We started the makeup by getting out clay. We rolled this into a sausage like shape before proceeding to flatten it out into a flatter shape. We then tried to apply this clay to Alex, but we could not get it to stick. In order to try and get it to stick we thought that it would be a good idea to use glue on the clay.


Now the clay was on the arm we used a clay carving tool in order to cut a crevice into the clay acting as the point where the weapon went deepest into the skin. We also applied a foundation around the clay in order to blend it into Alex's skin however, the foundation was not the right tone for Alex.

Finally we focues on adding the blood, we used the darker fake blood and put that around the centre of the wound and used normal fake blood around the rest of it. We used a sponge in order to apply the bloody so it looked more random, therefore realistic.

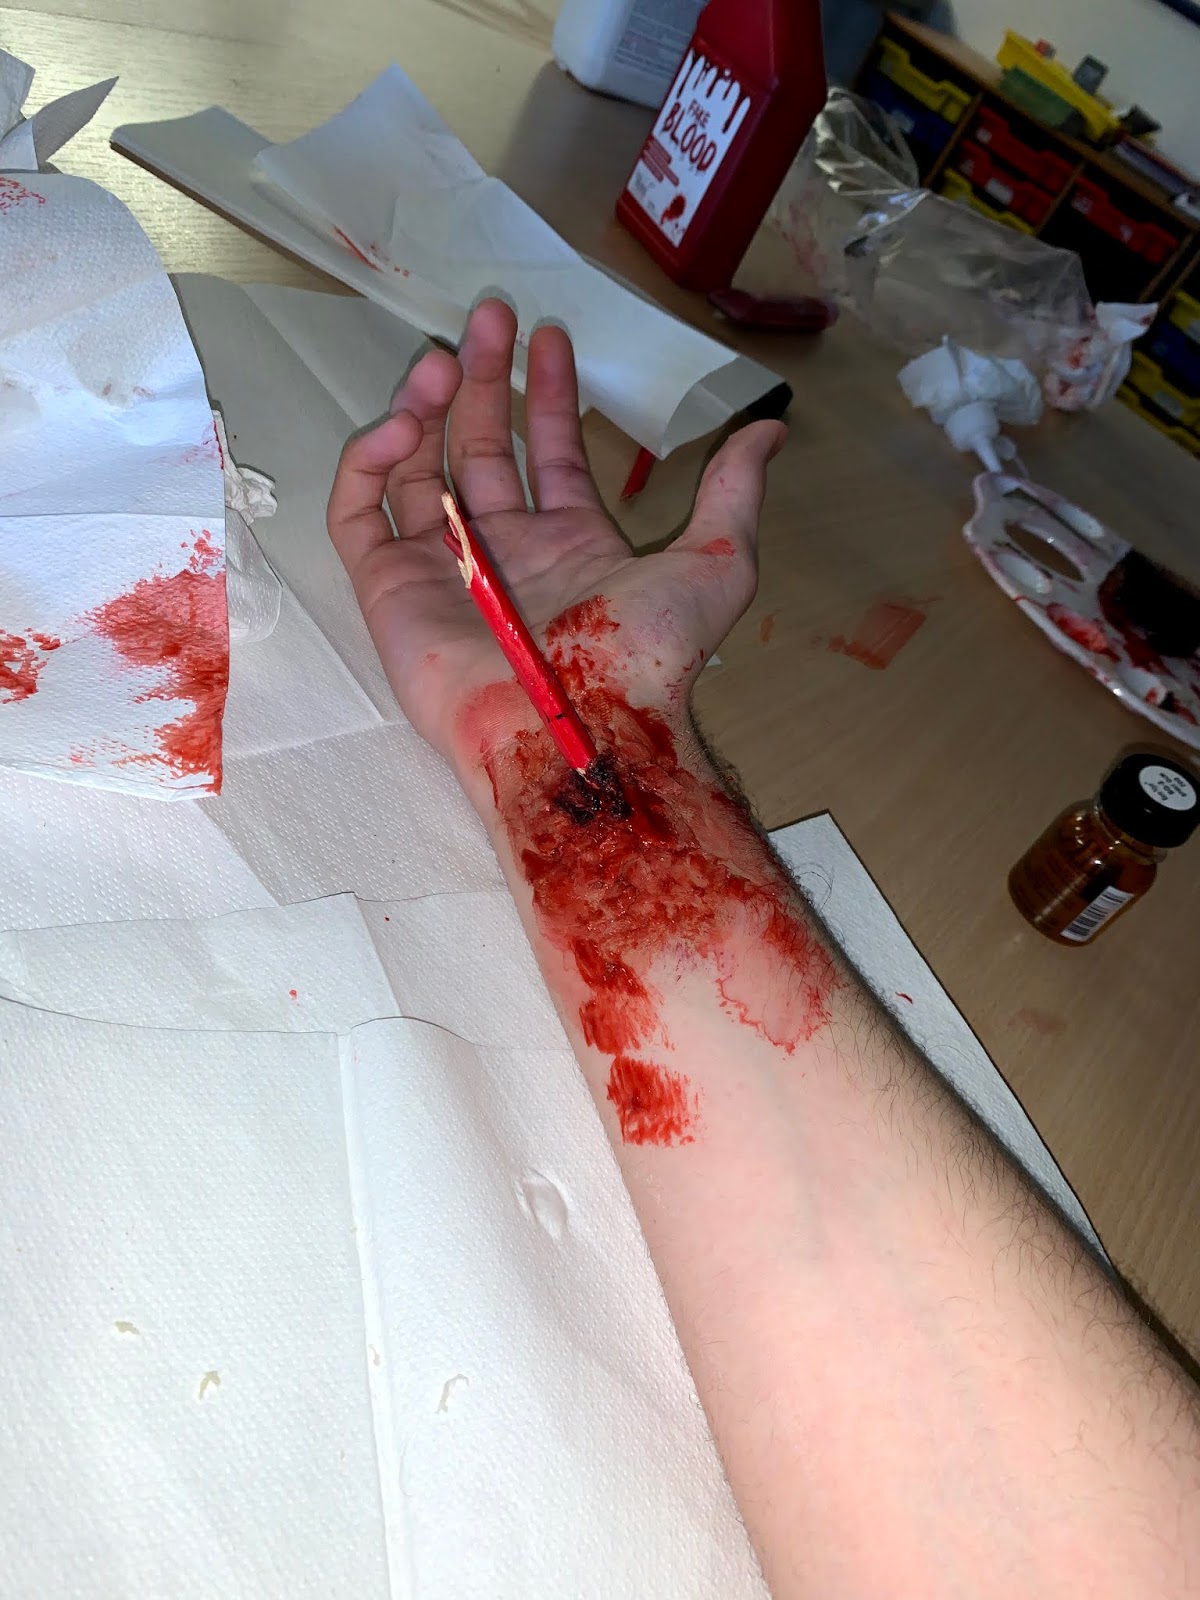
Above was the cut we ended up with, however we believed that is was missing something, so after a bit of experimenting we split a pencil and put it into the cut giving us the final result below.


Black Hole/Portal Effect
Having spent some time thinking about a visual effect I could employ for use in my mini FMP, I stumbled across the idea of making a portal (the video game) inspired video. If you look this up on YouTube you come across many different implementations of this.
The two videos above both take the idea of the portal gun from portal and bring it in to real life. They discover putting an object through one end of the portal means that it will come out of the other end. I believe I could take the portal idea and take it out of the video game theme. After looking around a bit more the similar portal effect was used in this short film.
Similarities seen within both of these effects is the link to having aspects of comedy in which I believe I could fully employ in my own use of portals.
In the video's the visual effects are used in order to create this object or thing which does not exist in the world at the current time. When VFX is used for this, it allows immersion to not be broken for the audience. If the portal was drawn onto a bit of paper and cut out (A SFX) it would not give of the same quality level as a VFX. Bad quality leads ti immersion being broken.
In order to understand how to do this I looked up after effects portal tutorial.
After spending some time watching tutorials on YouTube, these were the ones that stood out to me the most. I believe I can use all of them to help me make the effect to fit the idea I of the twenty second story I have in my head.
In the first video the tutorial goes really in depth on how to create a portal outline and the aesthetics of the portal well while the second video helps inspire me on more creative ways I can use the portal.
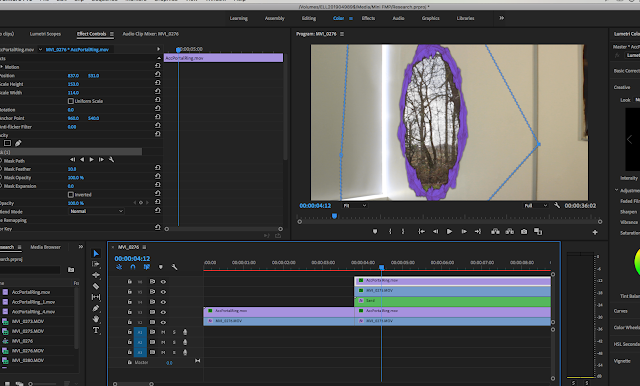
I decided to follow the first video, and use some of my own After Effects knowledge to create this portal ring.
1) In order to create thus I took 2 videos for the the location you can see through the portal and the location where the portal is and put it into After Effects.

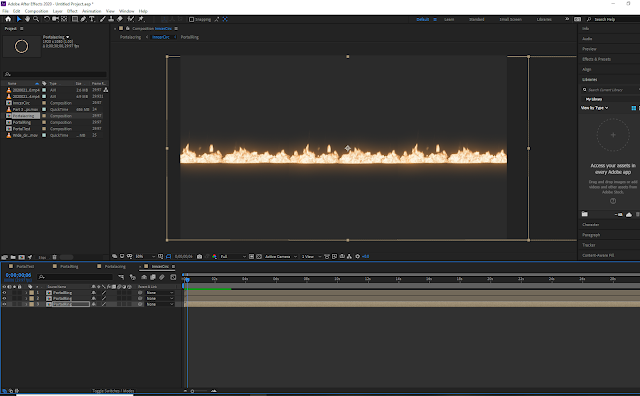
2) I now downloaded a free stock flame line affect. I put this into its own Composition and duplicated it several times to extend the time length.

3) I now duplicated the composition several times into one to extend the length of the flame.

4) I now went onto make a new composition and place the last one into that, before adding a Polar Coordinates effect to it to give it the circular shape.

5) Next we had to created the outside part of the ring. To do this I put the earlier long flame comp into the same comp and centred it.

6) I then went into the duplicated comp and flipped the flames.

7) I then added Polar Coordinates effect to give it the circular effect.


10) I then went onto change the scale of composition and added the tint colour effect to it.

11) In order to make the colour pop more, I downloaded the After Effects plugin 'Video Copilot Color Vibrance'.


13) I created a solid on one of the tracking points.

14) I place the portal ring comp in and copied the position properties of the solid onto it.


16) Finally I copied the properties of the solid layer onto the video I wanted to see through the portal.

I wanted to experiment if the project would be easier to do by using a green screen and premiere pro. I also took this opportunity to look into how I would achieve the effect of an item actually going through the portal. I used this tutorial which I found earlier in the project to help me: https://www.youtube.com/watch?v=THFEBp3AK2U
1) I started off knowing that I would need to Key the green screen. When I looked in the premiere pro effects panels there were lots of types of effects to key. In order to work out which was best I referred back to the tutorial to find they used the 'Ultra Key' effect.
2) After I keyed the green screen I went on to mask out the Sandwich (from a rough clip)


3) Next I made a quick portal ring In Adobe After Effects in order to put around the green screen to make the effect more realistic, however when I blended it, It began to become very faded and did not look very good. I therefore had to find another way to do it.


5) Next, I added a frame hold to the masked object layer and proceeded to add the original shot before masking below. This allowed me the control the movement of the sandwich.

6) Now I keyframed the movement to the object.
7) Finally I added masks in order to make it look like the object goes into the portal.

 8) Final Attempt - I was happy with using Premiere Pro for this project. I think that when it comes to creating the final thing I will use After effects to create the Portal ring and Premiere to do the rest. I will spend more time ensuring that the portal is a higher quality and has a transparent background directly in After effects as the short clip belows ring looks bad.

5) Next we had to created the outside part of the ring. To do this I put the earlier long flame comp into the same comp and centred it.

6) I then went into the duplicated comp and flipped the flames.

7) I then added Polar Coordinates effect to give it the circular effect.

8) I then went into the original line of fire comp to adjust the size of the flame.

9) I then went onto pre-compose the Inner and outer circle comps.


11) In order to make the colour pop more, I downloaded the After Effects plugin 'Video Copilot Color Vibrance'.

12) I now added 3D Camera tracker to the video in the base comp which has the portal location in.


14) I place the portal ring comp in and copied the position properties of the solid onto it.

15) I then added a mask to the green solid to allow it fit within the portal ring. I also feathered it a little.


1) I started off knowing that I would need to Key the green screen. When I looked in the premiere pro effects panels there were lots of types of effects to key. In order to work out which was best I referred back to the tutorial to find they used the 'Ultra Key' effect.
2) After I keyed the green screen I went on to mask out the Sandwich (from a rough clip)


4) Eventually after spending lots of time trying to change the portal in After Effects and then trying many different methods to get it to go well I decided to colour key the layer. This looked tolerable but not great.


6) Now I keyframed the movement to the object.
7) Finally I added masks in order to make it look like the object goes into the portal.

 8) Final Attempt - I was happy with using Premiere Pro for this project. I think that when it comes to creating the final thing I will use After effects to create the Portal ring and Premiere to do the rest. I will spend more time ensuring that the portal is a higher quality and has a transparent background directly in After effects as the short clip belows ring looks bad.
Hi Eddie, you showed good practice in your research. Would like to see more sourcing, a wider range of materials of research in your FMP
ReplyDelete